Monday 15 November 2010

All Tied Up


This one is a little arty farty but I kinda like it, heh heh.

I had a pile of elastic bands laying about in my desk for a little while, they were laid on a piece of white A4 paper with my desk lamp shining over.

I added a 2nd piece of paper behind and took the shot.

Sony A200, Minolta 100mm f/2.8, two pieces of A4 paper and a desk lamp.

Tuesday 9 November 2010

New Edition


Forgot to say, we have a new little one running around the house.

Her name is Martha, she is just over 7 weeks old and a Staffordshire Bull Terrier cross.

She came to us from a loving dog rescue, http://www.oncelovedrescue.org.uk/ check it out, they do superb work!

SONY DSC

A quick update – Macro Orchid


I’ve not updated my blog for a long long time :( . I’ve been having a pretty busy time of late with weddings, portraits and other commissioned studio work.

I thought I’d better check in with the blog with a quick update whilst I edit wedding and portrait shots.

Here are a few pictures taken with my 12 year old Minolta 35-70 f/4 which I recently macro hacked.

SONY DSC   SONY DSC   SONY DSC   SONY DSC


I’ll update soon with some wedding and portrait pictures soon.

Dave

Wednesday 22 September 2010

The Weeks Events - Living Without Broadband

This week has been an unusual one. At the beginning of last week I had notice that our broadband connection had been getting very slow and dropping allot. I did all the normal things, rebooted the router, made sure all the cables were ok but found no obvious errors.

So, I contacted our service provider BT and was advised to reboot the router as I had already done and call back if the problem persisted. I rebooted the router once more and again noticed no improvement so called back. The person who I got through to on the second call advised me that no call notes had been entered from the initial call and insisted I rebooted the router again.

After a brief exchange of the 'I cant believe it's' I asked the gentleman to call me back on my mobile before I rebooted the router so that I maintained a line of communication. He did and again the router was rebooted.

This time I did notice a vast difference in the broadband speed. It was now taking around 60 seconds to two minutes to load a simple web page such as Google and or Yahoo. The support operative ran some tests on our line finding no faults. He asked me to monitor the speed that day and if there was no improvement within 24 hours they would log a call with an engineer.

On the morning after the day before I checked the broadband and everything seemed to be fine, however when I returned from work that evening the broadband was pretty much non existent, again taking longer than dial up to load a white page with some blue text on it, 'Google'. Our BT Vision service was also jumping all over the place flashing faults V03 this and V04 that every five or so minutes.

I once more phoned BT and once more was told that there were no call notes from either of the previous day's calls. At this point I was quite frustrated. I explained to the support operative that I am paying for a service that for the past week I had been unable to use as advertised by BT and that I was not happy to find out none of the previous calls had been logged or passed on.

Again a line test was conducted and I was asked to monitor the connection, this time for 48 hours which I did.

Monday, one week later I got so fed up of the speed and connection dropping and not being able to watch any TV I called once more.

This time I was told that BT did not have any record of me ever having Broadband or BT Vision and that if I wished to order to product I should call another number?????? This came as a surprise seeing as I was actually calling them from a BT Hub phone from a BT Broadband Talk number.....

After some tiring and continual moaning at the operative she found our records and said that there was nothing they could do so they would book an engineer to visit the house. We arranged a day and time and left it at that.

Today, the engineer arrived right on time. I offered and made him a coffee, white with one and he set to work.
He replaced the main BT socket advising me that this was the problem and around an hour later departed, advising me that I would receive a phone call within 30 minutes to advise the state of the line after some further tests had been carried out.

I waited and 20 minutes later I received the call. It was the engineer that had carried out the work. He advised me that my line was now error free and that I would have full speed broadband back within an hour once the hub had settled.

An hour past and I tried the PC, still slow. I plugged my laptop directly into the hub, still slow. I tried my BT Vision box, which advised I had no physical broadband connection..... You guessed right I called BT.

This time, they had no problem finding my records and after I explained that the problem had not been resolved advised me that it normally takes ten days for the line and hub to sync correctly and that my speed would be slower than normal until the synchronisation was complete.

The support operative asked me to direct my browser to a BT speed tester which returned a download result of 84kb/s and an upload of 276kb/s. He said that this was unusually slow but it would be back to normal in ten days.

In the mean time I asked whether we would still be charged for the BT Vision and Broadband services that we were not able to use. I was told I would be charged as normal as there was an active broadband connection to my house and that I would have to wait the ten days before lodging and request for a refund. He went on to say that it would be very unlikely that BT would honour a refund, again due to there being an active but unusable broadband connection.


There is a semi silver lining. Vodafone, my mobile phone provider called me around 1600 to advise that my contract is nearly 7 months over the upgrade period. They tried to flog the latest iPhone to me again but ended up answering question with a very pleasing answer.

When I took my business contract out with them I added an unlimited data package that remains with me until I upgrade to a newer contract.

After the call, I connected my phone to the PC and hey presto. 1.8Mb broadband.


Below are some pictures taken this week that I have been able to upload with the help of the wonderful people at Vodafone :) No thanks go to BT!!

The Orbiter, I took this on Saturday night. I had headed into town to try and get some shots of the carnival. There was quite a crowd and I did not want to get in anyone's way so I settled for this.


Hawker Hunter FGA9 XE601, taxiing to Hunter Flying Ltd, Northside, Exeter International Airport.
Hawker Hunter FGA9 XE601 forms part of Team Viper.
Team Viper ™ is the only Strikemaster & Hunter Team in the World. Flying a combination of Supersonic Hawker Hunter jets and BAC 176 Strikemasters the jets convey an aura of classical elegance, which we affectionately describe as Power, Heritage and Soul.
As the only such team in the World, we aim to show these unique and incredible fighter jets and classic jet aviation, in a way that is both elegantly extreme and totally unique.
The team is named after the Rolls Royce Viper engine found in the Strikemaster and both aircraft have a very rich heritage around the World, as a significant export success for Britain and were flown by many air forces globally as front line fighters.
The team is completely unique being both privately owned and flown by military pilots from the British Royal Air Force.

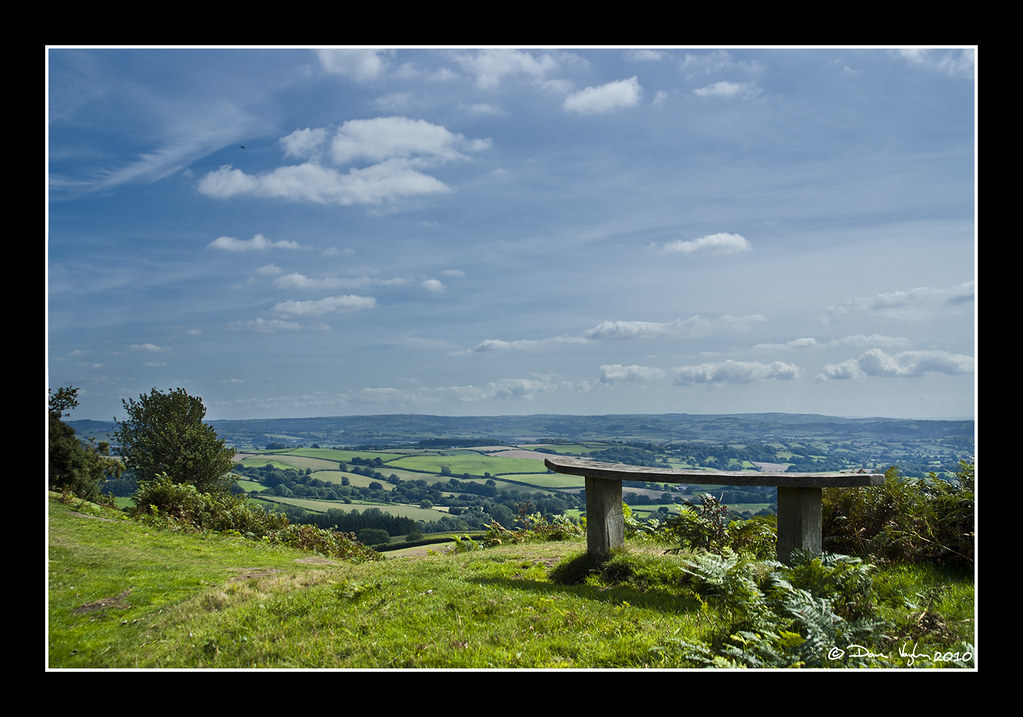
I took this at work one evening. The light has blown out an area where the sun penetrates the clouds but I love the 3D look of the clouds and the rays of light bursting through them.


Stay tuned, more to come soon....... And I promise the next post wont be so much of a rant. 

Friday 3 September 2010

Photopics on Facebook

Photopics is a Facebook group created for people to share their themed photographs. Every week a new challenge will be set and will be open to all. Each individual can upload a maximum of three un-photoshopped pictures. At the end of the challenge the admin's will pick a short-list and the entire group can vote for their winner.

The weekly winner will get to pick the next challenge subject and their winning picture will become the group logo for the week.

http://www.facebook.com/group.php?gid=125288790854080 

Wednesday 1 September 2010

Pilsdon Pen, Dorset

We went for a walk up Pilsdon Pen today. Pilsdon is a 277 metre high hill in West Dorset with 360 degree views across the county. Its also a great place to walk the dog, up and down the hill soon tired him out.


I took the picture above half way up. It is looking south across the beautiful countryside.

I think the bench adds something extra to the shot and aids the viewing of this beautiful scene.

The shot was taken using a Sony A200 DSLR, Minolta 17-35mm lens at 17mm f10 and ISO 100. I used a circular polariser to bring back some colour into the very bright sky. I also upped the contrast on the camera to boost the detail in the fore and midground.


A scene from the top of the hill. This stone mount has found on the of the hill's summit.

I wanted to try and get more of the landscape in the shot but only had my small tripod with me.

This picture comprises of 6 shots stitched together in Photoshop CS5 and was taken with a Sony A200, Minolta 17-35mm at 20mm f8 and ISO100. I also used the polariser in this shot.


The White Horse. The beautiful creature was minding his own business when I walked past the fence adjoining his field. I stood for a while before he started to walk toward me. He was quite a character, cantering back and fourth.

This shot was taken with a Sony A200, Sony 75-300mm lens at 200mm f8 and ISO 100.


A moody 'Cow'. When we reached to top, there were seven cows, 5 laying down and two stood up. This golden brown beauty proceeded to drop a very smelly present on her friends that were laying down before slowly moving toward me in an inquisitive manor.

I moved a little closer to gauge how she would react, eventually laying on the ground just in front of her to take this shot.

Taken with a Sony A200, Minolta 17-35mm lens at 17mm f4 ISO 100.

Thursday 26 August 2010

A few pictures from this week


Its been a very busy week so my blog has taken a back seat. Here are a few pictures I have snapped over the past seven days.

SONY DSC

Thomas Cook Boeing 757 200 series. The aircraft is being pushed back from stand seven at Exeter Airport.

Its departing Exeter with over 250 passengers on route to Antalya. This is a weekly service from Exeter and one of two Turkish routes operated by Thomas Cook during the summer season.


SONY DSC

Royal Air Force Hawk, one of 12 Hawks the Red Arrows brought to Exeter on the 25th August 2010.

The Arrows were due to display at Torbay, however the low cloud base and very poor visibility meant the display was cancelled.

The Red Arrows base at Exeter for 7 displays every year.


SONY DSC

Flybe Dash 8-Q400 (DH4) G-JECS, departing Exeter Airport on the 25th August 2010.

There was allot of moister in the air, the aircrafts props are showing this off leaving vapour/vortex trails.

Exeter is base to three Dash Q400’s and one Embraer 195 as well as being home to Flybe’s HQ and main engineering facility.

SONY DSC

The Red Arrows, lined up along the south apron at Exeter Airport.

Quite a noisy/grainy effect in this picture but I like it and think it adds something to the shot.


I have a few weddings and events booked for the coming weeks so will try and post some more picture sets soon.

Tuesday 24 August 2010

Sony A33, A55, A560 & A580 First Look


intro-001[1]

Sony unveiled some pretty impressive new cameras this morning. The A560 and 580 that follow traditional design and the A33 & A55 which use a new and innovative semi-translucent mirror system.

DP Preview have reviewed the A55 which is linked below.


First Look

A560, A580 First Look

A33, A55 First Look

SLT A55 Review, by DPreview

Thursday 19 August 2010

Wildlife on Tap


I like many others have a great passion for wildlife, there is something about watching wild animals in natural habitats working their way through life, encountering and overcoming daily problems.

Whilst I am not a great fan of Zoo’s I appreciate their importance in the protection of endangered species and in some cases reintroducing animals into the wild. They also offer a great opportunity to see, get close to and take photos of animals that they would not normally see.

There are also a large number of animal parks dotted around the UK that in my opinion offer a better life style to the animals, giving them more space to roam and are less controlling over their activities. They also offer much better opportunities for photographers to get more natural shots.

From places like Richmond Park in London to The Monkey Sanctuary in Loo there are hundreds of great parks to visit. You can find a fairly comprehensive list here.

Below are a few shots I have taken, mostly at parks local to me.

SONY DSC   SONY DSC
4428057048_158cc0cc3a_o[1]   4590701782_55d7a94f22_o[1]

KLM Economy Comfort


I’ve just been sorting though some old emails I’ve been sent and labelled with ‘keep’ . Its a very clever stunt by KLM.


Ideas on the back of a post card please………

Wednesday 18 August 2010

Air Transat A310 C-GSAT 18/8/2010

Air Transat A310 C-GSAT getting airborne, runway 26 from Exeter International Airport on the 18th August 2010.

Tuesday 17 August 2010

Macro Eye

SONY DSC


I really like shooting macro shots of eye’s and making the eye’s detail jump out. One of the best ways of doing this is with selective colour.


This shot was taken with my Sony A200, Minolta 100mm macro lens @ f18. The below diagram shows the setup.

I made a background copy layer in Photoshop, added a layer mask and painted out the eyes. Once done, I selected the eyes and upped the saturation, vibrancy and contrast. Job done.

LightingSetup

Fujifilm launches FinePix W3 3D Compact Camera


W3_Front_Left_s-001[1]

Fujifilm has launched its second 3D compact camera in the shape of FinePix Real 3D W3 allowing users to shoot HD videos and stills. It inherits the same techonology including the dual 10MP CCD sensors and twin lenses of the W1, but comes with a larger 3.5" 3D LCD compared to the 2.8" screen of the previous model. It offers a new Auto 3D mode and records sound in stereo. Images and videos taken with the camera can be viewed on 3D televisions and the company's 3D photo frames.

Read More

Monday 16 August 2010

Panoramas – How to make them?


We’ve all seen panoramic views, maybe on a restaurant wall on in your dentist.

Many modern digital cameras have built in panoramic tools built, helping you capture what you see. These tools are great but some are restricted. Some camera’s internal processors crop the pictures they create, you end up with the picture you wanted in many cases but when you download it to your pc it may be no bigger in pixel length than a normal picture from your camera.

In order to make a great panorama, you will need to take a series of pictures. Using the camera in the portrait position enables you to created larger / taller pictures with more detail. When taking each shot, be sure to overlap the previous shot. This will enable either program to join the pictures easier more effectively.

Picture_Set


There are some great applications out there to help you make full sized great quality panoramic and upsized pictures. We will cover two, one a each end of the money spectrum.

Microsoft’s Live Photo Gallery
Adobe’s Photoshop CS5


Live Photo Gallery is Microsoft’s free photo management / social sharing application. It offers some basic photo and video manipulation tools but has a great panoramic engine. Photoshop CS5 is Adobe’s latest offering of its world famous full fat graphics editing program. CS5 is packed with some powerful tools including an easy to use but extremely accurate panoramic engine.


I took this picture of Exmouth beach in March 2010. Its made up of 6 shots resulting in a picture 24207 x 13547 pixels per inch.

I will use the pictures used to create this panorama to walk through how to create it in both Live Photo and Photoshop.


We will walk through Live Photo first.

Once you have loaded the Live Photo application, select the pictures you wish to join in the panorama, seen in LP_PN_1. Then click ‘Make’ and ‘Create Panoramic Photo’.

Live Photo will then do pretty much everything else for you. Once the panorama is created, Live Photo will ask you to save the picture. I would recommend saving the file as a TIFF. This will save an un-compressed full size and quality version of the panorama. You can choose to save the file as a JPEG but you may find image quality is reduced.

Once the panorama has saved you may wonder what has happened, there will be a curvy black border all the way around the picture, see LP_PN_5. This is the area that Live Photo could not join. In Live Photo, there are no advanced tools that will let you clone this area.

Click ‘Fix’ on to the bar of the window and the click on the ‘Crop’ tool, LP_PN_6. Crop the best area of the picture being sure not to catch any of the black area’s, LP_PN_7 and then click ‘Apply’

Your final picture will be saved automatically.

LP_PN_1 LP_PN_2
LP_PN_1 LP_PN_2
LP_PN_3 LP_PN_4
LP_PN_3 LP_PN_4
LP_PN_5 LP_PN_6
LP_PN_5 LP_PN_6
LP_PN_7 LP_PN_8
LP_PN_7 LP_PN_8


To create the panorama in Photoshop, there is a similar process.

Take a look through the picture walkthrough below. Once Photoshop has loaded, click ‘File’ and move to ‘Automate’ then ‘Photomerge’. A new window will load (PS_PN_"2), click browse and select the pictures you wish to merge. On the left hand side of the window there are some output options. I mainly use ‘Cylindrical’ as I find it gives the best results. I would recommend having a play and working out which one suites your needs most.

Once your happy with the files selected and the output option click ‘OK’, Photoshop will then work its way through, build the panorama, join and mask the joins. Once complete you will be left with a similar output file to Live Photo as seen in PS_PN_5. You could choose to crop the picture like in Live Photo or you could use the content aware fill function within CS5.

To use content aware, you will need to flatten the layers, click the grey down arrow above the opacity selection on the layers pallet. Click ‘Flatten Layers’. Once this is done, select the magic wand tool and select an area of white that is bordering the panorama (PS_PN_7). After selecting, hit the delete key and select ‘Content Aware Fill’ from the drop down menu, click ok. Photoshop will fill the selected areas using a very clever algorithm. You may have to clone out some join marks but it does not take very long.

Once you have filled all white area’s and cloned out any joins you will be left with a stunning panorama.

Depending on your system specs, you may have to select small areas at a time when using content aware. It is a very memory hungry tool.


PS_PN_1 PS_PN_2
PS_PN_1 PS_PN_2
PS_PN_3 PS_PN_4
PS_PN_3 PS_PN_4
PS_PN_5 PS_PN_6
PS_PN_5 PS_PN_6
PS_PN_7 PS_PN_8
PS_PN_7 PS_PN_8
PS_PN_9  
PS_PN_9  


Please contact me with any questions and feel free to post your panoramas in the comments section.

Sunday 15 August 2010

What’s annoyed me today…


In the last two months I have received two emails from couples that had recently got married. Both the emails were asking if I could look at pictures taken on their wedding days and provide a quotation if I was able to improve their quality.

I took a look at some of the pictures the first couple emailed me and was shocked, not one of the pictures was in focus. Some of them were so soft any sharpening would have made them look worse. I emailed the couple back and said I would not be able to help, I advised them to speak to their original photographer and seek compensation.

Today I received another email from a couple who had contacted me two months ago for a wedding quote. I was not successful in my tender, quoting from their reply to my quotation.

“Dave,

Thank you for your quotation to photograph our wedding day and reception. Whilst we were both very impressed with the pics we saw in your portfolio we have chosen to use another photographer.

Neither of us know anything about photography so have taken advice from a friend of ours. The photographer we have chosen uses Canon equipment which we have been advised is the best.

Once again, thank you for your quotation”

The email I found in my inbox today read somewhat different. They had also fallen foul of a poor photographer. Stating the pictures were dark, blurry and grainy.

They did not send any examples, rather asked to meet and discuss options including a reshoot of the bride, groom and family.


This problem seems to be a growing one, there seem to be a number of photographers out there that do not care about the reputations of photographers that pride themselves in their work.

I would advise anyone looking for a wedding photographer to meet with the photographer prior to signing any contract or agreeing any terms, ask to see their portfolio and ask for a pre wedding portrait, something I offer all my clients.

This way, you will get any idea of the photographers style, personality and quality of work.

Saturday 14 August 2010

Google Picasa 3.6


We all know that Google has its hands in allot of pies and that most of the software, apps and tools are free. Picasa is Google’s free image management, editor and sharing application available for PC, Mac and Linux.

The latest version, 3.6 offers some great tools for everyone. As well as offering a very intuitive way to manage your pictures and videos Picasa helps you print, share content online via blogs and web albums, export and resize and add geographical location data.

Picasa’s layout is very easy to navigate, the application automatically keeps your files up to date in folders organised by name and timeline. This really helps when trying to find pictures taken some time ago. You can also customize the management pane to organise via tags.

When you select a managed folder form the list its contents are displayed within the main window pane.
Picasa_Layout

Once an image or video is selected with a single click the lower bar is activated. This lets you; upload your picture(s) to your Picasa web album to share with your friends, email the selected pictures, ready them for printing, export them in different sized and formats, buy prints of your pictures, Blog them, create funky looking collages, make videos and add geographical information.

edit_mode If you double click a picture, Picasa opens up the edit mode.

The edit mode is packed with easy to use tools such as Red Eye removal, Auto Corrections as well as correction sliders for highlights and shadows. It also has 12 effects to pick from including mono conversion and adding old fashioned film grain to your pictures.

Overall Picasa is a great little application. By no means it is not a replacement for the heavyweights such as Adobe Lightroom or Aperture, however it is perfect for managing your pictures, quick and easy editing and sharing your pictures.

I would recommend Picasa to anyone just starting out in photography or someone wanting an easy to use tool for mobile computing.

SONY NEX 5 shipping with 18-200 £1098


Sony are now shipping their NEX 5 E-Mount compact interchangeable camera with their all new 18-200mm lens.

Amazon Price £1098… More Info

Friday 13 August 2010

Sony NEX Camera’s get a new lens


Sony have today announced a new lens for their NEX line of compact interchangeable lens camera range.

The new 18-200mm f3.5 – 6.3 E Mount lens is available for pre-order from a few UK outlets. (Amazon UK £835 Delivered)

There are no reviews or test shots available as yet but it will be interesting to see how this lens performs. I am not a great fan of ‘Super Zooms’ they tend to have barrel distortion at when used to their extremities and images can be slightly soft at the edges.

Photoshop CS5 – Review One Month On…

Photoshop CS5 has been with us now for a little over a month now, there was a lot of hype prior to its release.

Adobe really wanted to push its new functionality, features such as the content aware fill and new HDR engine.

I have been using CS5 on a Mac and PC since it’s release so thought I would put together a little review based on my findings. The two platforms play very different, something that has annoyed and intrigued me.

Photoshop’s layout has remained relatively the same for many versions. Adobe has continued this with CS5 changing only a few minor things.

The main visual changes are the addition of the ‘Mini Bridge’ application and the ‘CS Live’ community. Both of which we will cover in more depth further on in the review.

cs5

When I first moved to Digital, HDR really intrigued me. I know allot of people frown upon HDR or heavily enhanced shots but HDR is here to stay. Many photographers use HDR to give their work a little boost. CS4’s HDR function was very basic and never really worked for me. The new HDR engine in CS5 is much improved. The new engine allows the user much more control similar to that of 3rd part HDR applications.

HDR Example

SONY DSC

3 original files

 SONY DSC SONY DSC SONY DSC

One of the most exiting additions in CS5 in ‘Content Aware Fill’. I could not wait to try this feature, I shot allot of landscape and aircraft panorama’s. When building the panorama’s on CS4 I was always left with blank borders and areas will no picture detail. In order to solve this you could either crop out the blank area’s resulting in a smaller picture or you could build them out using the clone tool.

I tended to use the clone tool to keep the size of my pictures as large as possible, this was a massively time consuming process. Some pictures taking upwards to 10 hours to complete.

CS5’s Content Aware Fill promised to solve this, by selecting the area hitting the delete key and selecting ‘Content Aware’ Photoshop uses a clever algorithm to fill the blank spaces with a very believable clone of the area sounding the blank areas.

I first tried this on my Mac and it worked very well, I was left with a little tidying up to do around the edges but overall the tool worked well. However when I tired this on my PC I was continually hit with an error, ‘Not Enough Memory’. My PC was pretty much the same spec as my Mac but it just would not cope when using this tool. I played around with mu scratch disk location as advised by Adobe Support but to no avail.

I had planned to upgrade my PC from 4GB to 8GB of RAM fairly soon so when I saw a deal online I upgraded. At first the additional 4GB made a massive difference. Content Aware worked, fast and effectively.

This video demonstrates Content Aware in action.


Digital File Handling. High ISO, Photoshop CS4 was pretty good at handling high ISO shots, CS5 is much better. ACR (Adobe Camera Raw) 6 handles noise very well and allows the photographer much more room to move.

With the consumer sales of DSLR’s rising month on month, there are thousands of users out there that will find noise a problem. Shots of school shows, displays and weddings are the kind of picture that people want to keep, low light in many of these situations forces the user to bump up the ISO.

CS5 also includes a Lens Profile Creator, it enables user to create lens and camera profiles that can be used to correct photographs taken today or next week. The system also allows users to share these profiles, I personally think this is a great move by Adobe. Not all lenses and camera bodies have profiles available from the manufacturers so profiles created by users will be a greatly welcomes social addition.

Here is an example of what CS5’s noise reduction can do.
Shot with Sony A200, CZ16-80mm @70mm f10 ISO 800
Original                                    Edited
org acr


CS5 also includes a mini version of its very useful Bridge application. The new ‘Mini Bridge’ allows you asset control from within Photoshop without the need to swap between the two applications.

Within mini bridge you can;

  • Batch name your files from within search and replace.
  • Batch convert to JPEG
  • Watermark your work with text or an image when exporting to PDF

I personally think this is a great addition, I use Bridge allot and find the mini version very useful, especially when working on my laptop at an event.


Conclusion

I know I have not covered every angle of CS5 but I only wanted to give a quick overview including what I have found over the past month or so.
CS5 is not just an upgrade to CS4 it is a vast improvement, Adobe have listened to customer feedback and introduced feature that photographer and digital artists have asked for.

Content aware fill, the new HDR engine and high ISO handling really save time and are very welcome features.

I will post updates of problems, resolutions and anything else I stumble upon over the coming months.